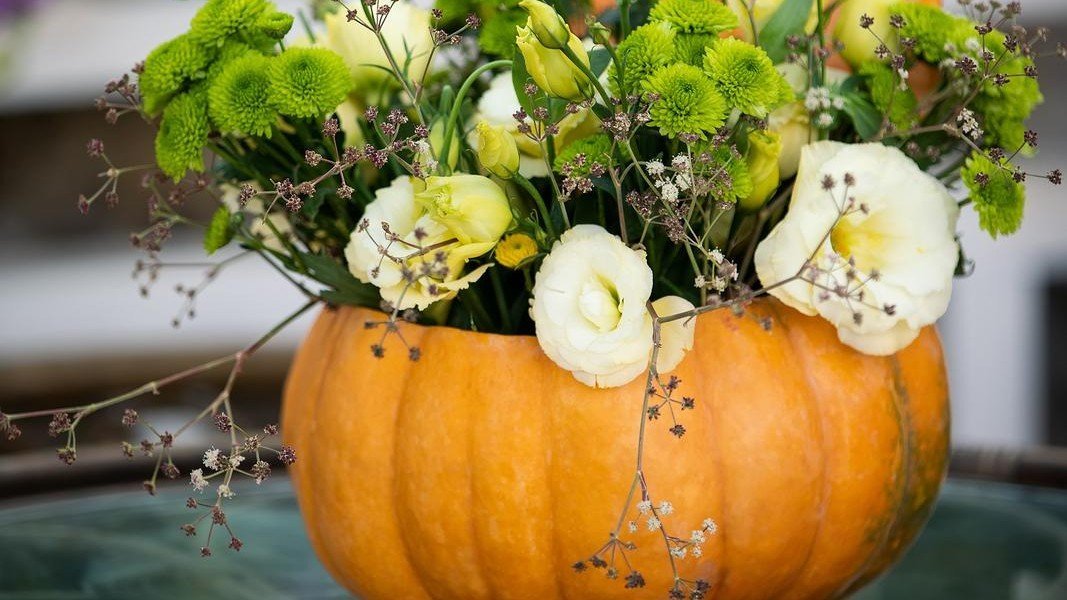
How to Use Halloween Pumpkins as Planters
Halloween pumpkins contribute to a lot of waste every year, and one of the most eco-friendly ways to dispose of a pumpkin is by using it in your garden.
A pumpkin planter is a wonderful way to decorate for autumn and grow some plants with extra nutrition. While temporary, pumpkin planters can decompose while holding plants and release nutrients into the soil.
After the pumpkin planter has started sagging and rotting, you can plant the pumpkin in dirt or compost it if you’d like to move the plant into its new home. This way, there will be no waste generated from carving Halloween pumpkins!
How to make pumpkin planters
Before you make your pumpkin planter, you need to choose a plant to pot. Any potted plant will do, but you should look for plants that survive or flourish during autumn, such as violas, perennials, and woody herbs.
Multiple bedding plants can give you more variety, but any nursery plant should work.
You can even plant succulents in your pumpkin planter.
Many DIY succulent pumpkin planter articles recommend gluing the succulents to the pumpkin or using a terracotta pumpkin. You don’t need to do this! Hot glue is synthetic and is not safe to be composted, and a terracotta pumpkin ruins the point of disposing of your pumpkins in an environmentally friendly way.
Once you have some plants in mind and ready, it’s time to make the planter.
Remove any wax, candles, or candle holders from the carved pumpkin. Once the pumpkin is empty, cut a drainage hole in the bottom to prevent water from collecting in the bottom. You can either cut out one main hole or drill multiple holes for drainage.
Fill the pumpkin with soil to between the one-third and halfway point. You only need lightweight potting soil.
Insert your plants carefully on top of the soil before gently filling around them with more soil. Try not to overdo the soil and work out how much soil was used for them in their previous container.
You should treat the plants as you would with a normal planter until it begins decaying.
For the top of the pumpkin, I recommend adding it to the compost or even putting it in another plant pot, packed in and covered with dirt. If you don’t have any other plants or a compost heap, you can leave the pumpkin lid out for wildlife to eat.
How to make an eco-friendly hanging pumpkin planter
Hanging pumpkin planters are also popular, though almost everybody advises using pots they already have.
While this is fine for DIY hanging pots you want to have all year, you can also make hanging pumpkin planters.
Unfortunately, they’re less likely to last as long as grounded pumpkin planters, but you might like it for Halloween night.
If you leave your hanging pumpkin planter up for longer than a few nights, it will start dripping. Once the pumpkin begins to rot it will also become softer and could be in danger of collapsing altogether.
To hang your pumpkin planter, macrame or simpler rope hanging techniques can help.
If you have some spare wood or an old chopping board you can create a rope hanging planter with support from the ‘shelf’ for your pumpkin, helping it last longer as there will be no pressure on the sides of the pumpkin.
The Spruce Crafts’ macrame hanging plant holder tutorial is fit for beginners, just replace mentions of ‘pot’ with ‘pumpkin’ – and remember to take it down after Halloween!
Where to place a pumpkin planter
Picking the right location is important to ensure that your plants have enough sunlight.
If you want to give your pumpkin planter the best chance of lasting through November, keep it out of direct sunlight, rain, or snow. The heat of the sun will accelerate decomposition, while rain will assist rot, and the snow will preserve the pumpkin and could mess with the natural decomposition of the planter.
A covered area outside in the shade is the best place for a pumpkin planter, but you can also display it indoors. You should put a tray or plate under it to catch any pumpkin juice or water.
It’s a good idea to clean this regularly, as rotting pumpkin can attract flies, and the more liquid in the tray the more flies might find it a good spot to visit.
Pumpkin planters can decorate the garden or porch along with other planters, or you can even display your pumpkin planters as statement centerpieces.
How long will a pumpkin planter last?
Pumpkin planters typically last a month, though it also depends on their conditions. They may rot quicker if stored outside, particularly in the rain.
The fresher the pumpkin you choose for your planter, the longer it will last. Pumpkins with soft spots, browning, or visible mold will rot sooner even if you store them indoors and do everything you can to make them last longer.
Unlike traditional planters, you don’t want your pumpkin planter to last more than a month usually, as it’s most beneficial for the plant to have it decay, releasing nutrients from the pumpkin into the plant’s soil.
Ignore recommendations to use preservation methods on your pumpkin planter – preserving pumpkin planters doesn’t always work and can instead speed up decay.
More importantly, preserving pumpkin makes it unsuitable for composting. Synthetic chemicals like bleach, hydrogen peroxide, and acrylic can kill organic matter, including the plants you put in your planter.
What should you do with a decaying pumpkin planter?
Once your pumpkin planter begins to show signs of decay or rot, take the planter out to your garden or the plant’s intended home.
If you intend to move your pumpkin-grown plants to a different planter or pot, composting the pumpkin is the best choice. You could even compost it in an empty plant pot with some carbon sources such as paper.
Alternatively, you can bury the pumpkin in dirt to give the remaining nutrients to your garden. This can help keep the soil fertile throughout winter.
Planting your pumpkin planter
Instead of removing your plants from the pumpkin planter, you can plant them still contained in the pumpkin.
It’s best to do this if you’re planting them in the ground rather than a container, as it can spread to nearby plants and feed minibeasts in the soil.
If you have a big enough pot, you can add the pumpkin planter and plants into it. Make sure to cover the bottom of the pot with soil before placing the pumpkin inside, then fill the sides of the pumpkin with more soil.
Be warned: rotting pumpkin can smell awful, so I recommend only doing this for outside pots!
How to compost your pumpkin
To compost your pumpkin, cut up its remains to enable it to compost faster.
If you don’t want to touch it, put it in the ground or heap ready and use something else to collapse and grind it. By now, the pumpkin should be soft enough that it has little resistance.
Cover the pumpkin with your carbon sources. If you’ve never composted before, dried leaves, sawdust, and wood chips are carbon-rich materials.
You should loosely cover your mashed or cut up pumpkin, and then leave it for nature to take its course. Once fully composted, you can sprinkle the compost over your plants.